티스토리 뷰
안녕하세요. CloudNet@ K8S Study를 진행하며 해당 내용을 이해하고 공유하기 위해 작성한 글입니다. 해당 내용은 EKS docs와 workshop을 기본으로 정리하였습니다.
실습 환경
# YAML 파일 다운로드
$ curl -O https://s3.ap-northeast-2.amazonaws.com/cloudformation.cloudneta.net/K8S/eks-oneclick3.yaml

# CloudFormation 스택 배포
$ aws cloudformation deploy --template-file eks-oneclick3.yaml --stack-name myeks --parameter-overrides KeyName=kp-hayley3 SgIngressSshCidr=$(curl -s ipinfo.io/ip)/32  MyIamUserAccessKeyID=AKIA5... MyIamUserSecretAccessKey='CVNa2...' ClusterBaseName=myeks --region ap-northeast-2

# CloudFormation 스택 배포 완료 후 작업용 EC2 IP 출력
$ aws cloudformation describe-stacks --stack-name myeks --query 'Stacks[*].Outputs[0].OutputValue' --output text

# 작업용 EC2 SSH 접속
$ ssh -i ~/.ssh/kp-hayley3.pem ec2-user@$(aws cloudformation describe-stacks --stack-name myeks --query 'Stacks[*].Outputs[0].OutputValue' --output text)

# default 네임스페이스 적용
$ kubectl ns default

# (옵션) context 이름 변경
$ NICK=<각자 자신의 닉네임>
$ NICK=hayley
$ kubectl ctx
$ kubectl config rename-context admin@myeks.ap-northeast-2.eksctl.io $NICK@myeks

# EFS 확인 : AWS 관리콘솔 EFS 확인해보자
$ mount -t efs -o tls $EfsFsId:/ /mnt/myefs
$ df -hT --type nfs4
Filesystem     Type  Size  Used Avail Use% Mounted on
127.0.0.1:/    nfs4  8.0E     0  8.0E   0% /mnt/myefs


# 노드 정보 확인
$ kubectl get node --label-columns=node.kubernetes.io/instance-type,eks.amazonaws.com/capacityType,topology.kubernetes.io/zone
NAME                                               STATUS   ROLES    AGE     VERSION                INSTANCE-TYPE   CAPACITYTYPE   ZONE
ip-192-168-1-177.ap-northeast-2.compute.internal   Ready    <none>   5m36s   v1.24.13-eks-0a21954   t3.xlarge       ON_DEMAND      ap-northeast-2a
ip-192-168-2-23.ap-northeast-2.compute.internal    Ready    <none>   5m40s   v1.24.13-eks-0a21954   t3.xlarge       ON_DEMAND      ap-northeast-2b
ip-192-168-3-177.ap-northeast-2.compute.internal   Ready    <none>   5m38s   v1.24.13-eks-0a21954   t3.xlarge       ON_DEMAND      ap-northeast-2c

$ eksctl get iamidentitymapping --cluster eks-hayley
ARN          USERNAME    GROUPS     ACCOUNT
arn:aws:iam::90XXXXXX:role/eksctl-eks-hayley-nodegroup-ng1-NodeInstanceRole-4X157VVQ0STM system:node:{{EC2PrivateDNSName}} system:bootstrappers,system:nodes

# 노드 IP 확인 및 PrivateIP 변수 지정
$ N1=$(kubectl get node --label-columns=topology.kubernetes.io/zone --selector=topology.kubernetes.io/zone=ap-northeast-2a -o jsonpath={.items[0].status.addresses[0].address})
$ N2=$(kubectl get node --label-columns=topology.kubernetes.io/zone --selector=topology.kubernetes.io/zone=ap-northeast-2b -o jsonpath={.items[0].status.addresses[0].address})
$ N3=$(kubectl get node --label-columns=topology.kubernetes.io/zone --selector=topology.kubernetes.io/zone=ap-northeast-2c -o jsonpath={.items[0].status.addresses[0].address})
$ echo "export N1=$N1" >> /etc/profile
$ echo "export N2=$N2" >> /etc/profile
$ echo "export N3=$N3" >> /etc/profile
$ echo $N1, $N2, $N3
192.168.1.177, 192.168.2.23, 192.168.3.177

# 노드 보안그룹 ID 확인
$ NGSGID=$(aws ec2 describe-security-groups --filters Name=group-name,Values='*ng1*' --query "SecurityGroups[*].[GroupId]" --output text)
$ aws ec2 authorize-security-group-ingress --group-id $NGSGID --protocol '-1' --cidr 192.168.1.100/32
{
    "Return": true,
    "SecurityGroupRules": [
        {
            "SecurityGroupRuleId": "sgr-0df92c7076f61749b",
            "GroupId": "sg-0735470079e0131c6",
            "GroupOwnerId": "90XXXXXX",
            "IsEgress": false,
            "IpProtocol": "-1",
            "FromPort": -1,
            "ToPort": -1,
            "CidrIpv4": "192.168.1.100/32"
        }
    ]
}

# 워커 노드 SSH 접속
$ for node in $N1 $N2 $N3; do ssh ec2-user@$node hostname; done

# ExternalDNS
$ MyDomain=<자신의 도메인>
$ echo "export MyDomain=<자신의 도메인>" >> /etc/profile
$ MyDomain=wellbeconnected.com
$ echo "export MyDomain=wellbeconnected.com" >> /etc/profile

$ MyDnzHostedZoneId=$(aws route53 list-hosted-zones-by-name --dns-name "${MyDomain}." --query "HostedZones[0].Id" --output text)
$ echo $MyDomain, $MyDnzHostedZoneId
$ curl -s -O https://raw.githubusercontent.com/gasida/PKOS/main/aews/externaldns.yaml
$ MyDomain=$MyDomain MyDnzHostedZoneId=$MyDnzHostedZoneId envsubst < externaldns.yaml | kubectl apply -f -
serviceaccount/external-dns created
clusterrole.rbac.authorization.k8s.io/external-dns created
clusterrolebinding.rbac.authorization.k8s.io/external-dns-viewer created
deployment.apps/external-dns created

# kube-ops-view
$ helm repo add geek-cookbook https://geek-cookbook.github.io/charts/
$ helm install kube-ops-view geek-cookbook/kube-ops-view --version 1.2.2 --set env.TZ="Asia/Seoul" --namespace kube-system
$ kubectl patch svc -n kube-system kube-ops-view -p '{"spec":{"type":"LoadBalancer"}}'
$ kubectl annotate service kube-ops-view -n kube-system "external-dns.alpha.kubernetes.io/hostname=kubeopsview.$MyDomain"
$ echo -e "Kube Ops View URL = http://kubeopsview.$MyDomain:8080/#scale=1.5"
Kube Ops View URL = http://kubeopsview.$MyDomain:8080/#scale=1.5"
Kube Ops View URL = http://kubeopsview.wellbeconnected.com:8080/#scale=1.5

# AWS LB Controller
$ helm repo add eks https://aws.github.io/eks-charts
$ helm repo update
$ helm install aws-load-balancer-controller eks/aws-load-balancer-controller -n kube-system --set clusterName=$CLUSTER_NAME \
  --set serviceAccount.create=false --set serviceAccount.name=aws-load-balancer-controller
NAME: aws-load-balancer-controller
LAST DEPLOYED: Sun May 21 00:21:30 2023
NAMESPACE: kube-system
STATUS: deployed
REVISION: 1
TEST SUITE: None
NOTES:
AWS Load Balancer controller installed!

# EBS csi driver 설치 확인
$ eksctl get addon --cluster ${CLUSTER_NAME}
$ kubectl get pod -n kube-system -l 'app in (ebs-csi-controller,ebs-csi-node)'
$ kubectl get csinodes
NAME                                  READY   STATUS    RESTARTS   AGE
ebs-csi-controller-5d4666c6f8-2j4sr   6/6     Running   0          5m34s
ebs-csi-controller-5d4666c6f8-d8vnb   6/6     Running   0          5m34s
ebs-csi-node-2l2gr                    3/3     Running   0          5m34s
ebs-csi-node-5mdfk                    3/3     Running   0          5m34s
ebs-csi-node-hxgxm                    3/3     Running   0          5m34s

# gp3 스토리지 클래스 생성
$ kubectl get sc
$ cat <<EOT > gp3-sc.yaml
kind: StorageClass
apiVersion: storage.k8s.io/v1
metadata:
  name: gp3
allowVolumeExpansion: true
provisioner: ebs.csi.aws.com
volumeBindingMode: WaitForFirstConsumer
parameters:
  type: gp3
  allowAutoIOPSPerGBIncrease: 'true'
  encrypted: 'true'
EOT
$ kubectl apply -f gp3-sc.yaml
$ kubectl get sc
NAME            PROVISIONER             RECLAIMPOLICY   VOLUMEBINDINGMODE      ALLOWVOLUMEEXPANSION   AGE
gp2 (default)   kubernetes.io/aws-ebs   Delete          WaitForFirstConsumer   false                  19m
gp3             ebs.csi.aws.com         Delete          WaitForFirstConsumer   true                   4s

# 이미지 정보 확인
$ kubectl get pods --all-namespaces -o jsonpath="{.items[*].spec.containers[*].image}" | tr -s '[[:space:]]' '\n' | sort | uniq -c

# eksctl 설치/업데이트 addon 확인
$ eksctl get addon --cluster $CLUSTER_NAME
NAME   VERSION   STATUS ISSUES IAMROLE  UPDATE AVAILABLE CONFIGURATION VALUES
aws-ebs-csi-driver v1.18.0-eksbuild.1 ACTIVE 0 arn:aws:iam::903XXXXXXX:role/eksctl-eks-hayley-addon-aws-ebs-csi-driver-Role1-1JOTUNWCVD1C0
coredns   v1.9.3-eksbuild.3 ACTIVE 0
kube-proxy  v1.24.10-eksbuild.2 ACTIVE 0
vpc-cni   v1.12.6-eksbuild.2 ACTIVE 0 arn:aws:iam::903XXXXXX:role/eksctl-eks-hayley-addon-vpc-cni-Role1-2GFBP2TUK7RE

# IRSA 확인
$ eksctl get iamserviceaccount --cluster $CLUSTER_NAME
NAMESPACE NAME    ROLE ARN
kube-system aws-load-balancer-controller arn:aws:iam::90XXXXX:role/eksctl-eks-hayley-addon-iamserviceaccount-ku-Role1-1CWM8C5UCIY69
kube-system efs-csi-controller-sa  arn:aws:iam::90XXXXXX:role/eksctl-eks-hayley-addon-iamserviceaccount-ku-Role1-D8RM3QVY0M0C
EKS Console
쿠버네티스 API를 통해서 리소스 및 정보를 확인 할 수 있습니다.[참고 : 링크]
$ kubectl get ClusterRole | grep eks
eks:addon-manager                                                      2023-05-20T15:02:29Z
eks:az-poller                                                          2023-05-20T15:02:25Z
eks:certificate-controller-approver                                    2023-05-20T15:02:25Z
eks:certificate-controller-signer                                      2023-05-20T15:02:25Z
eks:cloud-controller-manager                                           2023-05-20T15:02:25Z
eks:cloud-provider-extraction-migration                                2023-05-20T15:02:25Z
eks:cluster-event-watcher                                              2023-05-20T15:02:25Z
eks:fargate-manager                                                    2023-05-20T15:02:29Z
eks:fargate-scheduler                                                  2023-05-20T15:02:25Z
eks:k8s-metrics                                                        2023-05-20T15:02:25Z
eks:node-bootstrapper                                                  2023-05-20T15:02:29Z
eks:node-manager                                                       2023-05-20T15:02:29Z
eks:nodewatcher                                                        2023-05-20T15:02:25Z
eks:pod-identity-mutating-webhook                                      2023-05-20T15:02:25Z
eks:podsecuritypolicy:privileged                                       2023-05-20T15:02:30Z
eks:tagging-controller                                                 2023-05-20T15:02:25Z
Logging in EKS
- Control Plane logging — 로그 그룹- 로그 이름( /aws/eks/<cluster-name>/cluster ) — Docs
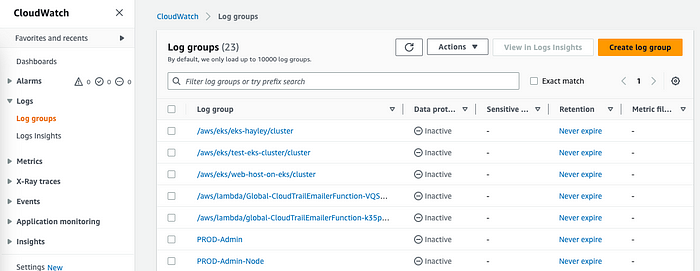
# 모든 로깅 활성화
$ aws eks update-cluster-config --region $AWS_DEFAULT_REGION --name $CLUSTER_NAME \
    --logging '{"clusterLogging":[{"types":["api","audit","authenticator","controllerManager","scheduler"],"enabled":true}]}'
{
    "update": {
        "id": "3a2ca74c-45f0-4d8f-894f-02d6ac6e3927",
        "status": "InProgress",
        "type": "LoggingUpdate",
        "params": [
            {
                "type": "ClusterLogging",
                "value": "{\"clusterLogging\":[{\"types\":[\"api\",\"audit\",\"authenticator\",\"controllerManager\",\"scheduler\"],\"enabled\":true}]}"
            }
        ],
        "createdAt": "2023-05-21T01:31:40.793000+09:00",
        "errors": []
    }
}
# 로그 그룹 확인
$ aws logs describe-log-groups | jq
{
  "logGroups": [
    {
      "logGroupName": "/aws/eks/eks-hayley/cluster",
      "creationTime": 1684600306007,
      "metricFilterCount": 0,
      "arn": "arn:aws:logs:ap-northeast-2:90XXXXXXXXX:log-group:/aws/eks/eks-hayley/cluster:*",
      "storedBytes": 0
    },
    {
      "logGroupName": "/aws/eks/test-eks-cluster/cluster",
      "creationTime": 1662223609172,
      "metricFilterCount": 0,
      "arn": "arn:aws:logs:ap-northeast-2:90XXXXXXXXX:log-group:/aws/eks/test-eks-cluster/cluster:*",
      "storedBytes": 409854697
    },
    {
      "logGroupName": "/aws/eks/web-host-on-eks/cluster",
      "creationTime": 1682774448274,
      "metricFilterCount": 0,
      "arn": "arn:aws:logs:ap-northeast-2:90XXXXXXXXX:log-group:/aws/eks/web-host-on-eks/cluster:*",
      "storedBytes": 8386445
    },
    {
      "logGroupName": "/aws/lambda/Global-CloudTrailEmailerFunction-VQSAI74LNK8f",
      "creationTime": 1627103806034,
      "metricFilterCount": 0,
      "arn": "arn:aws:logs:ap-northeast-2:90XXXXXXXXX:log-group:/aws/lambda/Global-CloudTrailEmailerFunction-VQSAI74LNK8f:*",
      "storedBytes": 37377
    },
    {
      "logGroupName": "/aws/lambda/global-CloudTrailEmailerFunction-k35pmu1l8PUf",
      "creationTime": 1626804794832,
      "metricFilterCount": 0,
      "arn": "arn:aws:logs:ap-northeast-2:90XXXXXXXXX:log-group:/aws/lambda/global-CloudTrailEmailerFunction-k35pmu1l8PUf:*",
      "storedBytes": 55984
    },
...

# 로그 tail 확인 : aws logs tail help
$ aws logs tail /aws/eks/$CLUSTER_NAME/cluster | more

# 신규 로그를 바로 출력
$ aws logs tail /aws/eks/$CLUSTER_NAME/cluster --follow

# 필터 패턴
$ aws logs tail /aws/eks/$CLUSTER_NAME/cluster --filter-pattern <필터 패턴>

# 로그 스트림이름
# aws logs tail /aws/eks/$CLUSTER_NAME/cluster --log-stream-name-prefix <로그 스트림 prefix> --follow
$ aws logs tail /aws/eks/$CLUSTER_NAME/cluster --log-stream-name-prefix kube-controller-manager --follow
$ kubectl scale deployment -n kube-system coredns --replicas=1
$ kubectl scale deployment -n kube-system coredns --replicas=2

# 시간 지정: 1초(s) 1분(m) 1시간(h) 하루(d) 한주(w)
$ aws logs tail /aws/eks/$CLUSTER_NAME/cluster --since 1h30m

# 짧게 출력
$ aws logs tail /aws/eks/$CLUSTER_NAME/cluster --since 1h30m --format short

- CloudWatch Log Insights — 쿼리로 필터링해서 볼 수 있습니다. [링크]
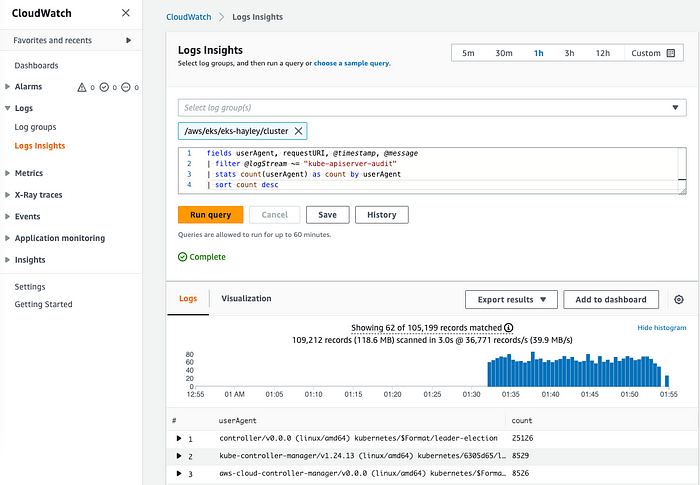
# EC2 Instance가 NodeNotReady 상태인 로그 검색
fields @timestamp, @message
| filter @message like /NodeNotReady/
| sort @timestamp desc

# kube-apiserver-audit 로그에서 userAgent 정렬해서 아래 4개 필드 정보 검색
# 어떤 userAgent가 API 로그를 사용했는지 감사 로그
fields userAgent, requestURI, @timestamp, @message
| filter @logStream ~= "kube-apiserver-audit"
| stats count(userAgent) as count by userAgent
| sort count desc

#
fields @timestamp, @message
| filter @logStream ~= "kube-scheduler"
| sort @timestamp desc

#
fields @timestamp, @message
| filter @logStream ~= "authenticator"
| sort @timestamp desc

#
fields @timestamp, @message
| filter @logStream ~= "kube-controller-manager"
| sort @timestamp desc- CloudWatch Log Insight Query with AWS CLI
# CloudWatch Log Insight Query
$ aws logs get-query-results --query-id $(aws logs start-query \
--log-group-name '/aws/eks/eks-hayley/cluster' \
--start-time `date -d "-1 hours" +%s` \
--end-time `date +%s` \
--query-string 'fields @timestamp, @message | filter @logStream ~= "kube-scheduler" | sort @timestamp desc' \
| jq --raw-output '.queryId')
{
    "results": [],
    "statistics": {
        "recordsMatched": 0.0,
        "recordsScanned": 0.0,
        "bytesScanned": 0.0
    },
    "status": "Running"
}- 로깅 끄기
# EKS Control Plane 로깅(CloudWatch Logs) 비활성화
$ eksctl utils update-cluster-logging --cluster $CLUSTER_NAME --region $AWS_DEFAULT_REGION --disable-types all --approve

# 로그 그룹 삭제
$ aws logs delete-log-group --log-group-name /aws/eks/$CLUSTER_NAME/cluster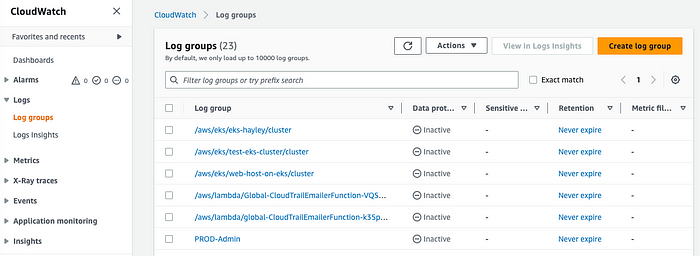
Logging inactive

해당 클러스터 Log group 삭제 확인
- Control Plane metrics with Prometheus & CW Logs Insights 쿼리
# 메트릭 패턴 정보 : metric_name{"tag"="value"[,...]} value
$ kubectl get --raw /metrics | more

# HELP aggregator_openapi_v2_regeneration_count [ALPHA] Counter of OpenAPI v2 sp
ec regeneration count broken down by causing APIService name and reason.
# TYPE aggregator_openapi_v2_regeneration_count counter
aggregator_openapi_v2_regeneration_count{apiservice="*",reason="startup"} 0
aggregator_openapi_v2_regeneration_count{apiservice="k8s_internal_local_delegati
on_chain_0000000002",reason="update"} 0
# HELP aggregator_openapi_v2_regeneration_duration [ALPHA] Gauge of OpenAPI v2 s
pec regeneration duration in seconds.
# TYPE aggregator_openapi_v2_regeneration_duration gauge
aggregator_openapi_v2_regeneration_duration{reason="startup"} 0.02443115
aggregator_openapi_v2_regeneration_duration{reason="update"} 0.024106275
# HELP aggregator_unavailable_apiservice [ALPHA] Gauge of APIServices which are
marked as unavailable broken down by APIService name.
# TYPE aggregator_unavailable_apiservice gauge
aggregator_unavailable_apiservice{name="v1."} 0
aggregator_unavailable_apiservice{name="v1.admissionregistration.k8s.io"} 0
aggregator_unavailable_apiservice{name="v1.apiextensions.k8s.io"} 0
aggregator_unavailable_apiservice{name="v1.apps"} 0
...- Managing etcd database size on Amazon EKS clusters
# How to monitor etcd database size? >> 아래 10.0.X.Y IP는 어디일까요? >> 아래 주소로 프로메테우스 메트릭 수집 endpoint 주소로 사용 가능한지???
$ kubectl get --raw /metrics | grep "etcd_db_total_size_in_bytes"
# HELP etcd_db_total_size_in_bytes [ALPHA] Total size of the etcd database file physically allocated in bytes.
# TYPE etcd_db_total_size_in_bytes gauge
etcd_db_total_size_in_bytes{endpoint="http://10.0.160.16:2379"} 4.427776e+06
etcd_db_total_size_in_bytes{endpoint="http://10.0.32.16:2379"} 4.493312e+06
etcd_db_total_size_in_bytes{endpoint="http://10.0.96.16:2379"} 4.616192e+06

$ kubectl get --raw=/metrics | grep apiserver_storage_objects |awk '$2>100' |sort -g -k 2

# CW Logs Insights 쿼리
fields @timestamp, @message, @logStream
| filter @logStream like /kube-apiserver-audit/
| filter @message like /mvcc: database space exceeded/
| limit 10

# How do I identify what is consuming etcd database space?
$ kubectl get --raw=/metrics | grep apiserver_storage_objects |awk '$2>100' |sort -g -k 2
$ kubectl get --raw=/metrics | grep apiserver_storage_objects |awk '$2>50' |sort -g -k 2
# HELP apiserver_storage_objects [STABLE] Number of stored objects at the time of last check split by kind.
# TYPE apiserver_storage_objects gauge
apiserver_storage_objects{resource="clusterrolebindings.rbac.authorization.k8s.io"} 75
apiserver_storage_objects{resource="clusterroles.rbac.authorization.k8s.io"} 89

# CW Logs Insights 쿼리 : Request volume - Requests by User Agent:
fields userAgent, requestURI, @timestamp, @message
| filter @logStream like /kube-apiserver-audit/
| stats count(*) as count by userAgent
| sort count desc

# CW Logs Insights 쿼리 : Request volume - Requests by Universal Resource Identifier (URI)/Verb:
filter @logStream like /kube-apiserver-audit/
| stats count(*) as count by requestURI, verb, user.username
| sort count desc

# Object revision updates
fields requestURI
| filter @logStream like /kube-apiserver-audit/
| filter requestURI like /pods/
| filter verb like /patch/
| filter count > 8
| stats count(*) as count by requestURI, responseStatus.code
| filter responseStatus.code not like /500/
| sort count desc

#
fields @timestamp, userAgent, responseStatus.code, requestURI
| filter @logStream like /kube-apiserver-audit/
| filter requestURI like /pods/
| filter verb like /patch/
| filter requestURI like /name_of_the_pod_that_is_updating_fast/
| sort @timestamp
컨테이너 로깅
# NGINX 웹서버 배포
$ helm repo add bitnami https://charts.bitnami.com/bitnami
"bitnami" has been added to your repositories

# 사용 리전의 인증서 ARN 확인
$ CERT_ARN=$(aws acm list-certificates --query 'CertificateSummaryList[].CertificateArn[]' --output text)
$ echo $CERT_ARN
arn:aws:acm:ap-northeast-2:90XXXXXX:certificate/3f025fab-6859-4cad-9d60-0c5887053d70

# 도메인 확인
$ echo $MyDomain
wellbeconnected.com

# 파라미터 파일 생성
$ cat <<EOT > nginx-values.yaml
service:
    type: NodePort

ingress:
  enabled: true
  ingressClassName: alb
  hostname: nginx.$MyDomain
  path: /*
  annotations:
    alb.ingress.kubernetes.io/scheme: internet-facing
    alb.ingress.kubernetes.io/target-type: ip
    alb.ingress.kubernetes.io/listen-ports: '[{"HTTPS":443}, {"HTTP":80}]'
    alb.ingress.kubernetes.io/certificate-arn: $CERT_ARN
    alb.ingress.kubernetes.io/success-codes: 200-399
    alb.ingress.kubernetes.io/load-balancer-name: $CLUSTER_NAME-ingress-alb
    alb.ingress.kubernetes.io/group.name: study
    alb.ingress.kubernetes.io/ssl-redirect: '443'
EOT
$ cat nginx-values.yaml | yh

# 배포
$ helm install nginx bitnami/nginx --version 14.1.0 -f nginx-values.yaml

# 확인
$ kubectl get ingress,deploy,svc,ep nginx
NAME                              CLASS   HOSTS                       ADDRESS                                                             PORTS   AGE
ingress.networking.k8s.io/nginx   alb     nginx.wellbeconnected.com   eks-hayley-ingress-alb-994512920.ap-northeast-2.elb.amazonaws.com   80      10s

NAME                    READY   UP-TO-DATE   AVAILABLE   AGE
deployment.apps/nginx   0/1     1            0           10s

NAME            TYPE       CLUSTER-IP      EXTERNAL-IP   PORT(S)        AGE
service/nginx   NodePort   10.100.59.220   <none>        80:30990/TCP   10s

NAME              ENDPOINTS   AGE
endpoints/nginx               10s

$ kubectl get targetgroupbindings # ALB TG 확인
NAME                           SERVICE-NAME   SERVICE-PORT   TARGET-TYPE   AGE
k8s-default-nginx-7955a49c3c   nginx          http           ip            19s

# 접속 주소 확인 및 접속
$ echo -e "Nginx WebServer URL = https://nginx.$MyDomain"
Nginx WebServer URL = https://nginx.$MyDomain"
Nginx WebServer URL = https://nginx.wellbeconnected.com

$ curl -s https://nginx.$MyDomain
$ kubectl logs deploy/nginx -f
nginx 17:12:41.10
nginx 17:12:41.10 Welcome to the Bitnami nginx container
nginx 17:12:41.10 Subscribe to project updates by watching https://github.com/bitnami/containers
nginx 17:12:41.10 Submit issues and feature requests at https://github.com/bitnami/containers/issues
nginx 17:12:41.10
nginx 17:12:41.11 INFO  ==> ** Starting NGINX setup **
nginx 17:12:41.12 INFO  ==> Validating settings in NGINX_* env vars
Generating RSA private key, 4096 bit long modulus (2 primes)
........................................++++
...........................................................................................................................++++
e is 65537 (0x010001)
Signature ok
subject=CN = example.com
Getting Private key
nginx 17:12:41.78 INFO  ==> No custom scripts in /docker-entrypoint-initdb.d
nginx 17:12:41.78 INFO  ==> Initializing NGINX
realpath: /bitnami/nginx/conf/vhosts: No such file or directory
nginx 17:12:41.80 INFO  ==> ** NGINX setup finished! **

nginx 17:12:41.81 INFO  ==> ** Starting NGINX **

# 반복 접속
$ while true; do curl -s https://nginx.$MyDomain -I | head -n 1; date; sleep 1; done
Sun May 21 02:13:54 KST 2023
Sun May 21 02:13:55 KST 2023
Sun May 21 02:13:56 KST 2023
...

# (참고) 삭제 시
helm uninstall nginx
컨테이너 로그 환경의 로그는 표준 출력 stdout과 표준 에러 stderr로 보내는 것을 권고 합니다 — 링크
# 로그 모니터링
$ kubectl logs deploy/nginx -f

# nginx 웹 접속 시도

# 컨테이너 로그 파일 위치 확인
$ kubectl exec -it deploy/nginx -- ls -l /opt/bitnami/nginx/logs/
total 0
lrwxrwxrwx 1 root root 11 Feb 18 13:35 access.log -> /dev/stdout
lrwxrwxrwx 1 root root 11 Feb 18 13:35 error.log -> /dev/stderr
(참고) nginx docker log collector 예시 — 링크 링크
RUN ln -sf /dev/stdout /opt/bitnami/nginx/logs/access.log
RUN ln -sf /dev/stderr /opt/bitnami/nginx/logs/error.log

# forward request and error logs to docker log collector
RUN ln -sf /dev/stdout /var/log/nginx/access.log \
 && ln -sf /dev/stderr /var/log/nginx/error.log
종료된 파드의 로그는 kubectl logs로 조회 할 수 없습니다.
$ helm uninstall nginx
release "nginx" uninstalled

$ kubectl logs deploy/nginx -f
Error from server (NotFound): deployments.apps "nginx" not found
kubelet 기본 설정은 로그 파일의 최대 크기가 10Mi로 10Mi를 초과하는 로그는 전체 로그 조회가 불가능합니다.
cat /etc/kubernetes/kubelet-config.yaml
...
containerLogMaxSize: 10Mi
(참고) EKS 수정 예시 :테스트 필요 — 링크
apiVersion: eksctl.io/v1alpha5
kind: ClusterConfig

metadata:
  name: <cluster-name>
  region: eu-central-1

nodeGroups:
  - name: worker-spot-containerd-large-log
    labels: { instance-type: spot }
    instanceType: t3.large
    minSize: 2
    maxSize: 30
    desiredCapacity: 2
    amiFamily: AmazonLinux2
    containerRuntime: containerd
    availabilityZones: ["eu-central-1a", "eu-central-1b", "eu-central-1c"]
    kubeletExtraConfig:
        containerLogMaxSize: "500Mi"
        containerLogMaxFiles: 5
파드 로깅
- CloudWatch Container Insights + Fluent Bit로 파드 로그 수집 가능합니다. [참고: 링크]
Container Insights metrics in Amazon CloudWatch & Fluent Bit (Logs)
CCI(CloudWatch Container Insight) : 노드에 CW Agent 파드와 Fluent Bit 파드가 데몬셋으로 배치되어 Metrics와 Logs를 수집합니다.
- Fluent Bit : (as a DaemonSet to send logs to CloudWatch Logs) Integration in CloudWatch Container Insights for EKS — Docs
[수집] Fluent Bit 컨테이너를 데몬셋으로 동작시키고, 아래 3가지 종류의 로그를 CloudWatch Logs 에 전송합니다.
- /aws/containerinsights/Cluster_Name/application : 로그 소스(All log files in /var/log/containers), 각 컨테이너/파드 로그
- /aws/containerinsights/Cluster_Name/host : 로그 소스(Logs from /var/log/dmesg, /var/log/secure, and /var/log/messages), 노드(호스트) 로그
- /aws/containerinsights/Cluster_Name/dataplane : 로그 소스(/var/log/journal for kubelet.service, kubeproxy.service, and docker.service), 쿠버네티스 데이터플레인 로그
[저장] : CloudWatch Logs 에 로그를 저장, 로그 그룹 별 로그 보존 기간 설정 가능합니다.
[시각화] : CloudWatch 의 Logs Insights 를 사용하여 대상 로그를 분석하고, CloudWatch 의 대시보드로 시각화합니다.
CloudWatch Container Insight는 컨테이너형 애플리케이션 및 마이크로 서비스에 대한 모니터링, 트러블 슈팅 및 알람을 위한 완전 관리형 관측 서비스입니다.
(사전 확인) 노드의 로그 확인
- application 로그 소스(All log files in /var/log/containers → 심볼릭 링크 /var/log/pods/<컨테이너>, 각 컨테이너/파드 로그
# 로그 위치 확인
#ssh ec2-user@$N1 sudo tree /var/log/containers
#ssh ec2-user@$N1 sudo ls -al /var/log/containers
$ for node in $N1 $N2 $N3; do echo ">>>>> $node <<<<<"; ssh ec2-user@$node sudo tree /var/log/containers; echo; done
>>>>> 192.168.1.177 <<<<<
/var/log/containers
├── aws-node-4f8w9_kube-system_aws-node-934c7cf05648511affa8131e706c70d68c6092ace16a0b498fd9a044bb36b1c3.log -> /var/log/pods/kube-system_aws-node-4f8w9_49fd3225-12b6-4986-ad41-dafb03dfcc65/aws-node/0.log
├── aws-node-4f8w9_kube-system_aws-vpc-cni-init-15dd31f982cdd0fbbbd5d6876da2c277808a2fb30079c987cea85af7d652b07a.log -> /var/log/pods/kube-system_aws-node-4f8w9_49fd3225-12b6-4986-ad41-dafb03dfcc65/aws-vpc-cni-init/0.log
├── coredns-6777fcd775-vz7wf_kube-system_coredns-317ede63cd6beaf247366f85c6455537f5755fcab92ff81da5645fc2a74c8df3.log -> /var/log/pods/kube-system_coredns-6777fcd775-vz7wf_ab78db97-770
...

$ for node in $N1 $N2 $N3; do echo ">>>>> $node <<<<<"; ssh ec2-user@$node sudo ls -al /var/log/containers; echo; done
>>>>> 192.168.1.177 <<<<<
total 8
drwxr-xr-x  2 root root 4096 May 20 15:21 .
drwxr-xr-x 10 root root 4096 May 20 15:11 ..
lrwxrwxrwx  1 root root   92 May 20 15:11 aws-node-4f8w9_kube-system_aws-node-934c7cf05648511affa8131e706c70d68c6092ace16a0b498fd9a044bb36b1c3.log -> /var/log/pods/kube-system_aws-node-4f8w9_49fd3225-12b6-4986-ad41-dafb03dfcc65/aws-node/0.log
...


# 개별 파드 로그 확인 : 아래 각자 디렉터리 경로는 다름
$ ssh ec2-user@$N1 sudo tail -f var/log/pods/kube-system_ebs-csi-controller-5d4666c6f8-2j4sr_5fc95aab-9f85-458d-9e6b-4eb3d4befbd6/liveness-probe/0.log
2. host 로그 소스(Logs from /var/log/dmesg, /var/log/secure, and /var/log/messages), 노드(호스트) 로그
# 로그 위치 확인
#ssh ec2-user@$N1 sudo tree /var/log/ -L 1
#ssh ec2-user@$N1 sudo ls -la /var/log/
$ for node in $N1 $N2 $N3; do echo ">>>>> $node <<<<<"; ssh ec2-user@$node sudo tree /var/log/ -L 1; echo; done
>>>>> 192.168.1.177 <<<<<
/var/log/
├── amazon
├── audit
├── aws-routed-eni
├── boot.log
├── btmp
├── chrony
├── cloud-init.log
├── cloud-init-output.log
├── containers
├── cron
├── dmesg
├── dmesg.old
├── grubby
├── grubby_prune_debug
├── journal
├── lastlog
├── maillog
├── messages
├── pods
├── sa
├── secure
├── spooler
├── tallylog
├── wtmp
└── yum.log

8 directories, 17 files
...

$ for node in $N1 $N2 $N3; do echo ">>>>> $node <<<<<"; ssh ec2-user@$node sudo ls -la /var/log/; echo; done
>>>>> 192.168.1.177 <<<<<
total 756
drwxr-xr-x  10 root   root              4096 May 20 15:11 .
drwxr-xr-x  18 root   root               254 May 13 01:36 ..
drwxr-xr-x   3 root   root                17 May 20 15:11 amazon
drwx------   2 root   root                23 May 13 01:36 audit
drwxr-xr-x   2 root   root                69 May 20 15:14 aws-routed-eni
-rw-------   1 root   root              1158 May 20 17:24 boot.log
-rw-------   1 root   utmp              9216 May 20 17:14 btmp
drwxr-x---   2 chrony chrony              72 May 13 01:36 chrony
-rw-r--r--   1 root   root            104780 May 20 15:11 cloud-init.log
-rw-r-----   1 root   root             12915 May 20 15:11 cloud-init-output.log
drwxr-xr-x   2 root   root              4096 May 20 15:21 containers
-rw-------   1 root   root              3648 May 20 17:30 cron
-rw-r--r--   1 root   root             31696 May 20 15:11 dmesg
-rw-r--r--   1 root   root             30486 May 13 01:37 dmesg.old
-rw-------   1 root   root              2375 May 13 01:37 grubby
-rw-r--r--   1 root   root               193 May  5 18:08 grubby_prune_debug
drwxr-sr-x+  4 root   systemd-journal     86 May 20 15:11 journal
-rw-r--r--   1 root   root            292584 May 20 15:11 lastlog
-rw-------   1 root   root               806 May 20 15:11 maillog
-rw-------   1 root   root            418361 May 20 17:30 messages
drwxr-xr-x   7 root   root              4096 May 20 15:21 pods
drwxr-xr-x   2 root   root                18 May 20 15:20 sa
-rw-------   1 root   root             56306 May 20 17:30 secure
-rw-------   1 root   root                 0 May  5 18:08 spooler
-rw-------   1 root   root                 0 May  5 18:08 tallylog
-rw-rw-r--   1 root   utmp              2304 May 20 15:11 wtmp
-rw-------   1 root   root              4188 May 20 15:11 yum.log
...

# 호스트 로그 확인
#ssh ec2-user@$N1 sudo tail /var/log/dmesg
#ssh ec2-user@$N1 sudo tail /var/log/secure
#ssh ec2-user@$N1 sudo tail /var/log/messages
$ for log in dmesg secure messages; do echo ">>>>> Node1: /var/log/$log <<<<<"; ssh ec2-user@$N1 sudo tail /var/log/$log; echo; done
$ for log in dmesg secure messages; do echo ">>>>> Node2: /var/log/$log <<<<<"; ssh ec2-user@$N2 sudo tail /var/log/$log; echo; done
$ for log in dmesg secure messages; do echo ">>>>> Node3: /var/log/$log <<<<<"; ssh ec2-user@$N3 sudo tail /var/log/$log; echo; done
3. dataplane 로그 소스(/var/log/journal for kubelet.service, kubeproxy.service, and docker.service), 쿠버네티스 데이터플레인 로그
# 로그 위치 확인
#ssh ec2-user@$N1 sudo tree /var/log/journal -L 1
#ssh ec2-user@$N1 sudo ls -la /var/log/journal
$ for node in $N1 $N2 $N3; do echo ">>>>> $node <<<<<"; ssh ec2-user@$node sudo tree /var/log/journal -L 1; echo; done
>>>>> 192.168.1.177 <<<<<
/var/log/journal
├── ec228e787715421fe93f95adb870076e
└── ec2d184089fd93a22cc04a98df97cc6d

2 directories, 0 files

>>>>> 192.168.2.23 <<<<<
/var/log/journal
├── ec22e5f5dab5aa19a843805f9279ae25
└── ec2d184089fd93a22cc04a98df97cc6d

2 directories, 0 files

>>>>> 192.168.3.177 <<<<<
/var/log/journal
├── ec2cd3270dd42439ea7b5d8e75c1fa04
└── ec2d184089fd93a22cc04a98df97cc6d

2 directories, 0 files

# 저널 로그 확인 - 링크
$ ssh ec2-user@$N3 sudo journalctl -x -n 200
$ ssh ec2-user@$N3 sudo journalctl -f
CloudWatch Container Insight 설치 : cloudwatch-agent & fluent-bit — 링크 & Setting up Fluent Bit — Docs
# 설치
$ FluentBitHttpServer='On'
$ FluentBitHttpPort='2020'
$ FluentBitReadFromHead='Off'
$ FluentBitReadFromTail='On'
$ curl -s https://raw.githubusercontent.com/aws-samples/amazon-cloudwatch-container-insights/latest/k8s-deployment-manifest-templates/deployment-mode/daemonset/container-insights-monitoring/quickstart/cwagent-fluent-bit-quickstart.yaml | sed 's/{{cluster_name}}/'${CLUSTER_NAME}'/;s/{{region_name}}/'${AWS_DEFAULT_REGION}'/;s/{{http_server_toggle}}/"'${FluentBitHttpServer}'"/;s/{{http_server_port}}/"'${FluentBitHttpPort}'"/;s/{{read_from_head}}/"'${FluentBitReadFromHead}'"/;s/{{read_from_tail}}/"'${FluentBitReadFromTail}'"/' | kubectl apply -f -
namespace/amazon-cloudwatch created
serviceaccount/cloudwatch-agent created
clusterrole.rbac.authorization.k8s.io/cloudwatch-agent-role created
clusterrolebinding.rbac.authorization.k8s.io/cloudwatch-agent-role-binding created
configmap/cwagentconfig created
daemonset.apps/cloudwatch-agent created
configmap/fluent-bit-cluster-info created
serviceaccount/fluent-bit created
clusterrole.rbac.authorization.k8s.io/fluent-bit-role created
clusterrolebinding.rbac.authorization.k8s.io/fluent-bit-role-binding created
configmap/fluent-bit-config created
daemonset.apps/fluent-bit created

# 설치 확인
$ kubectl get-all -n amazon-cloudwatch
$ kubectl get ds,pod,cm,sa -n amazon-cloudwatch
$ kubectl describe clusterrole cloudwatch-agent-role fluent-bit-role                          # 클러스터롤 확인
$ kubectl describe clusterrolebindings cloudwatch-agent-role-binding fluent-bit-role-binding  # 클러스터롤 바인딩 확인
$ kubectl -n amazon-cloudwatch logs -l name=cloudwatch-agent -f # 파드 로그 확인
$ kubectl -n amazon-cloudwatch logs -l k8s-app=fluent-bit -f    # 파드 로그 확인
$ for node in $N1 $N2 $N3; do echo ">>>>> $node <<<<<"; ssh ec2-user@$node sudo ss -tnlp | grep fluent-bit; echo; done
>>>>> 192.168.1.177 <<<<<
LISTEN 0      128          0.0.0.0:2020       0.0.0.0:*    users:(("fluent-bit",pid=6449,fd=188))

>>>>> 192.168.2.23 <<<<<
LISTEN 0      128          0.0.0.0:2020       0.0.0.0:*    users:(("fluent-bit",pid=6218,fd=194))

>>>>> 192.168.3.177 <<<<<
LISTEN 0      128          0.0.0.0:2020       0.0.0.0:*    users:(("fluent-bit",pid=6201,fd=193))

# cloudwatch-agent 설정 확인
$ kubectl describe cm cwagentconfig -n amazon-cloudwatch
Name:         cwagentconfig
Namespace:    amazon-cloudwatch
Labels:       <none>
Annotations:  <none>

Data
====
cwagentconfig.json:
----
{
  "agent": {
    "region": "ap-northeast-2"
  },
  "logs": {
    "metrics_collected": {
      "kubernetes": {
        "cluster_name": "eks-hayley",
        "metrics_collection_interval": 60
      }
    },
    "force_flush_interval": 5
  }
}


BinaryData
====

Events:  <none>

# CW 파드가 수집하는 방법 : Volumes에 HostPath를 살펴보자!
# / 호스트 패스 공유??? 보안상 안전한가? 좀 더 범위를 좁힐수는 없을까??
kubectl describe -n amazon-cloudwatch ds cloudwatch-agent
...

$ ssh ec2-user@$N1 sudo tree /dev/disk
/dev/disk
├── by-id
│   ├── nvme-Amazon_Elastic_Block_Store_vol010a945caeee4c208 -> ../../nvme0n1
│   ├── nvme-Amazon_Elastic_Block_Store_vol010a945caeee4c208-ns-1 -> ../../nvme0n1
│   ├── nvme-Amazon_Elastic_Block_Store_vol010a945caeee4c208-ns-1-part1 -> ../../nvme0n1p1
│   ├── nvme-Amazon_Elastic_Block_Store_vol010a945caeee4c208-ns-1-part128 -> ../../nvme0n1p128
│   ├── nvme-Amazon_Elastic_Block_Store_vol010a945caeee4c208-part1 -> ../../nvme0n1p1
│   ├── nvme-Amazon_Elastic_Block_Store_vol010a945caeee4c208-part128 -> ../../nvme0n1p128
│   ├── nvme-nvme.1d0f-766f6c3031306139343563616565653463323038-416d617a6f6e20456c617374696320426c6f636b2053746f7265-00000001 -> ../../nvme0n1
│   ├── nvme-nvme.1d0f-766f6c3031306139343563616565653463323038-416d617a6f6e20456c617374696320426c6f636b2053746f7265-00000001-part1 -> ../../nvme0n1p1
│   └── nvme-nvme.1d0f-766f6c3031306139343563616565653463323038-416d617a6f6e20456c617374696320426c6f636b2053746f7265-00000001-part128 -> ../../nvme0n1p128
├── by-label
│   └── \\x2f -> ../../nvme0n1p1
├── by-partlabel
│   ├── BIOS\\x20Boot\\x20Partition -> ../../nvme0n1p128
│   └── Linux -> ../../nvme0n1p1
├── by-partuuid
│   ├── 429d7ba4-0655-4ca8-921f-029767b39f97 -> ../../nvme0n1p128
│   └── dac0c6b1-d3db-4105-8fc1-71977e51c13e -> ../../nvme0n1p1
├── by-path
│   ├── pci-0000:00:04.0-nvme-1 -> ../../nvme0n1
│   ├── pci-0000:00:04.0-nvme-1-part1 -> ../../nvme0n1p1
│   └── pci-0000:00:04.0-nvme-1-part128 -> ../../nvme0n1p128
└── by-uuid
    └── d7f5c8a4-1699-470a-88f2-cb87476f6177 -> ../../nvme0n1p1

6 directories, 18 files


# Fluent Bit Cluster Info 확인
$ kubectl get cm -n amazon-cloudwatch fluent-bit-cluster-info -o yaml | yh
apiVersion: v1
data:
  cluster.name: eks-hayley
  http.port: "2020"
  http.server: "On"
  logs.region: ap-northeast-2
  read.head: "Off"
  read.tail: "On"
kind: ConfigMap
metadata:
  annotations:
    kubectl.kubernetes.io/last-applied-configuration: |
      {"apiVersion":"v1","data":{"cluster.name":"eks-hayley","http.port":"2020","http.server":"On","logs.region":"ap-northeast-2","read.head":"Off","read.tail":"On"},"kind":"ConfigMap","metadata":{"annotations":{},"name":"fluent-bit-cluster-info","namespace":"amazon-cloudwatch"}}
  creationTimestamp: "2023-05-20T17:32:22Z"
  name: fluent-bit-cluster-info
  namespace: amazon-cloudwatch
  resourceVersion: "36851"
  uid: 28bf645d-9e04-4cd6-b779-5aa6261138ac
...

# Fluent Bit 로그 INPUT/FILTER/OUTPUT 설정 확인 - 링크
## 설정 부분 구성 : application-log.conf , dataplane-log.conf , fluent-bit.conf , host-log.conf , parsers.conf
$ kubectl describe cm fluent-bit-config -n amazon-cloudwatch
...
application-log.conf:
----
[INPUT]
    Name                tail
    Tag                 application.*
    Exclude_Path        /var/log/containers/cloudwatch-agent*, /var/log/containers/fluent-bit*, /var/log/containers/aws-node*, /var/log/containers/kube-proxy*
    Path                /var/log/containers/*.log
    multiline.parser    docker, cri
    DB                  /var/fluent-bit/state/flb_container.db
    Mem_Buf_Limit       50MB
    Skip_Long_Lines     On
    Refresh_Interval    10
    Rotate_Wait         30
    storage.type        filesystem
    Read_from_Head      ${READ_FROM_HEAD}

[FILTER]
    Name                kubernetes
    Match               application.*
    Kube_URL            https://kubernetes.default.svc:443
    Kube_Tag_Prefix     application.var.log.containers.
    Merge_Log           On
    Merge_Log_Key       log_processed
    K8S-Logging.Parser  On
    K8S-Logging.Exclude Off
    Labels              Off
    Annotations         Off
    Use_Kubelet         On
    Kubelet_Port        10250
    Buffer_Size         0

[OUTPUT]
    Name                cloudwatch_logs
    Match               application.*
    region              ${AWS_REGION}
    log_group_name      /aws/containerinsights/${CLUSTER_NAME}/application
    log_stream_prefix   ${HOST_NAME}-
    auto_create_group   true
    extra_user_agent    container-insights
...

# Fluent Bit 파드가 수집하는 방법 : Volumes에 HostPath를 살펴보자!
$ kubectl describe -n amazon-cloudwatch ds fluent-bit
  fluentbitstate:
    Type:          HostPath (bare host directory volume)
    Path:          /var/fluent-bit/state
    HostPathType:
   varlog:
    Type:          HostPath (bare host directory volume)
    Path:          /var/log
    HostPathType:
   varlibdockercontainers:
    Type:          HostPath (bare host directory volume)
    Path:          /var/lib/docker/containers
    HostPathType:
   fluent-bit-config:
    Type:      ConfigMap (a volume populated by a ConfigMap)
    Name:      fluent-bit-config
    Optional:  false
   runlogjournal:
    Type:          HostPath (bare host directory volume)
    Path:          /run/log/journal
    HostPathType:
   dmesg:
    Type:          HostPath (bare host directory volume)
    Path:          /var/log/dmesg
    HostPathType:
...

$ ssh ec2-user@$N1 sudo tree /var/log
/var/log
├── amazon
│   └── ssm
│       ├── amazon-ssm-agent.log
│       └── audits
│           └── amazon-ssm-agent-audit-2023-05-20
├── audit
│   └── audit.log
├── aws-routed-eni
│   ├── egress-v4-plugin.log
│   ├── ipamd.log
│   └── plugin.log
├── boot.log
├── btmp
├── chrony
│   ├── measurements.log
│   ├── statistics.log
│   └── tracking.log
├── cloud-init.log
├── cloud-init-output.log
├── containers
│   ├── aws-node-4f8w9_kube-system_aws-node-934c7cf05648511affa8131e706c70d68c6092ace16a0b498fd9a044bb36b1c3.log -> /var/log/pods/kube-system_aws-node-4f8w9_49fd3225-12b6-4986-ad41-dafb03dfcc65/aws-node/0.log
│   ├── aws-node-4f8w9_kube-system_aws-vpc-cni-init-15dd31f982cdd0fbbbd5d6876da2c277808a2fb30079c987cea85af7d652b07a.log -> /var/log/pods/kube-system_aws-node-4f8w9_49fd3225-12b6-4986-ad41-dafb03dfcc65/aws-vpc-cni-init/0.log
│   ├── cloudwatch-agent-s2nb7_amazon-cloudwatch_cloudwatch-agent-061a493deafdcad54e80bef07245e888060126d686a7923e391b291b985c9664.log -> /var/log/pods/amazon-cloudwatch_cloudwatch-agent-s2nb7_ddf5b767-c3e1-4653-bd6d-f963543867db/cloudwatch-agent/0.log
│   ├── coredns-6777fcd775-vz7wf_kube-system_coredns-317ede63cd6beaf247366f85c6455537f5755fcab92ff81da5645fc2a74c8df3.log -> /var/log/pods/kube-system_coredns-6777fcd775-vz7wf_ab78db97-770c-4fc8-8fab-45a0738ca43f/coredns/0.log
│   ├── ebs-csi-node-2l2gr_kube-system_ebs-plugin-59091b835ae32499ae969850e7f033fc37c0c9373a748ffd1dd85275fea8adab.log -> /var/log/pods/kube-system_ebs-csi-node-2l2gr_a4ae3c7d-7d22-4dae-a649-05388a27c495/ebs-plugin/0.log
│   ├── ebs-csi-node-2l2gr_kube-system_liveness-probe-6ef127de871cb1491d2f93a5583638e54bc28f16d2d20948a3ec3e14340e991d.log -> /var/log/pods/kube-system_ebs-csi-node-2l2gr_a4ae3c7d-7d22-4dae-a649-05388a27c495/liveness-probe/0.log
│   ├── ebs-csi-node-2l2gr_kube-system_node-driver-registrar-cea0af65fdabbe8732066385feba935e46405dc10470abc855f540ffcef6b688.log -> /var/log/pods/kube-system_ebs-csi-node-2l2gr_a4ae3c7d-7d22-4dae-a649-05388a27c495/node-driver-registrar/0.log
│   ├── fluent-bit-dnlmt_amazon-cloudwatch_fluent-bit-8bfb76f7bd1205f978124c64cc43f79012994d0eefd3d60563a175fe6d8c1b42.log -> /var/log/pods/amazon-cloudwatch_fluent-bit-dnlmt_8c13b18d-0290-484b-8026-b7b8d5785a36/fluent-bit/0.log
│   ├── kube-ops-view-558d87b798-dkgxb_kube-system_kube-ops-view-fac78967c247f247ccdbcb0b1fe2e9c1168fe8ec38839382d43c7ad4da2a78a3.log -> /var/log/pods/kube-system_kube-ops-view-558d87b798-dkgxb_f62f2da2-7d94-42ea-8bb9-5d5f4dae69c4/kube-ops-view/0.log
│   └── kube-proxy-z7bk7_kube-system_kube-proxy-728d554902a8ff9d13fccbaff9eb291ec451907fde5a16ba446d26a0b60c8990.log -> /var/log/pods/kube-system_kube-proxy-z7bk7_579a63ce-1b00-4c62-8d9c-f73996ad713a/kube-proxy/0.log
├── cron
├── dmesg
├── dmesg.old
├── grubby
├── grubby_prune_debug
├── journal
│   ├── ec228e787715421fe93f95adb870076e
│   │   ├── system.journal
│   │   └── user-1000.journal
│   └── ec2d184089fd93a22cc04a98df97cc6d
│       └── system.journal
├── lastlog
├── maillog
├── messages
├── pods
│   ├── amazon-cloudwatch_cloudwatch-agent-s2nb7_ddf5b767-c3e1-4653-bd6d-f963543867db
│   │   └── cloudwatch-agent
│   │       └── 0.log
│   ├── amazon-cloudwatch_fluent-bit-dnlmt_8c13b18d-0290-484b-8026-b7b8d5785a36
│   │   └── fluent-bit
│   │       └── 0.log
│   ├── kube-system_aws-node-4f8w9_49fd3225-12b6-4986-ad41-dafb03dfcc65
│   │   ├── aws-node
│   │   │   └── 0.log
│   │   └── aws-vpc-cni-init
│   │       └── 0.log
│   ├── kube-system_coredns-6777fcd775-vz7wf_ab78db97-770c-4fc8-8fab-45a0738ca43f
│   │   └── coredns
│   │       └── 0.log
│   ├── kube-system_ebs-csi-node-2l2gr_a4ae3c7d-7d22-4dae-a649-05388a27c495
│   │   ├── ebs-plugin
│   │   │   └── 0.log
│   │   ├── liveness-probe
│   │   │   └── 0.log
│   │   └── node-driver-registrar
│   │       └── 0.log
│   ├── kube-system_kube-ops-view-558d87b798-dkgxb_f62f2da2-7d94-42ea-8bb9-5d5f4dae69c4
│   │   └── kube-ops-view
│   │       └── 0.log
│   └── kube-system_kube-proxy-z7bk7_579a63ce-1b00-4c62-8d9c-f73996ad713a
│       └── kube-proxy
│           └── 0.log
├── sa
│   └── sa20
├── secure
├── spooler
├── tallylog
├── wtmp
└── yum.log

29 directories, 50 files

# (참고) 삭제
curl -s https://raw.githubusercontent.com/aws-samples/amazon-cloudwatch-container-insights/latest/k8s-deployment-manifest-templates/deployment-mode/daemonset/container-insights-monitoring/quickstart/cwagent-fluent-bit-quickstart.yaml | sed 's/{{cluster_name}}/'${CLUSTER_NAME}'/;s/{{region_name}}/'${AWS_DEFAULT_REGION}'/;s/{{http_server_toggle}}/"'${FluentBitHttpServer}'"/;s/{{http_server_port}}/"'${FluentBitHttpPort}'"/;s/{{read_from_head}}/"'${FluentBitReadFromHead}'"/;s/{{read_from_tail}}/"'${FluentBitReadFromTail}'"/' | kubectl delete -f -- 로깅 확인 : CloudWatch -> Log Groups
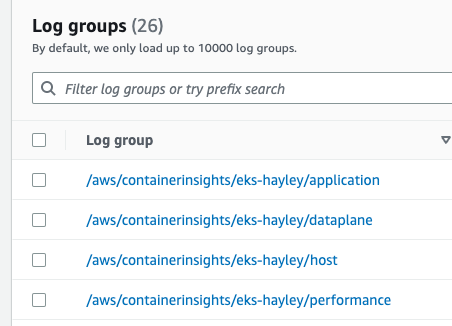
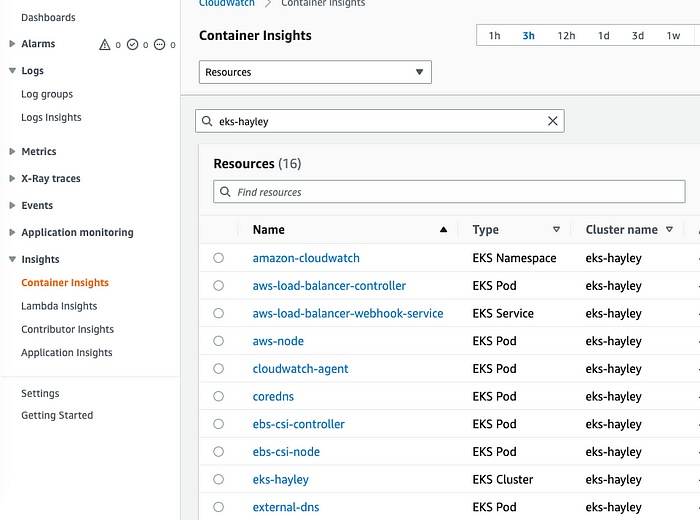
- 메트릭 확인 : CloudWatch → Insights → Container Insights : 우측 상단(Local Time Zone, 30분) ⇒ 리소스 : myeks 선택
Metrics-server & kwatch & botkube
Metrics-server 확인 : kubelet으로부터 수집한 리소스 메트릭을 수집 및 집계하는 클러스터 애드온 구성 요소 — EKS Github Docs CMD
# 배포
$ kubectl apply -f https://github.com/kubernetes-sigs/metrics-server/releases/latest/download/components.yaml

# 메트릭 서버 확인 : 메트릭은 15초 간격으로 cAdvisor를 통하여 가져옴
$ kubectl get pod -n kube-system -l k8s-app=metrics-server
$ kubectl api-resources | grep metrics
$ kubectl get apiservices |egrep '(AVAILABLE|metrics)'

# 노드 메트릭 확인
$ kubectl top node
NAME                                               CPU(cores)   CPU%   MEMORY(bytes)   MEMORY%
ip-192-168-1-177.ap-northeast-2.compute.internal   55m          1%     523Mi           3%
ip-192-168-2-23.ap-northeast-2.compute.internal    47m          1%     601Mi           4%
ip-192-168-3-177.ap-northeast-2.compute.internal   55m          1%     588Mi           3%

# 파드 메트릭 확인
$ kubectl top pod -A
$ kubectl top pod -n kube-system --sort-by='cpu'
NAME                                           CPU(cores)   MEMORY(bytes)
kube-ops-view-558d87b798-dkgxb                 9m           34Mi
metrics-server-6bf466fbf5-m5kn4                9m           17Mi
aws-node-x2fpq                                 5m           38Mi
aws-node-4f8w9                                 5m           37Mi
...

$ kubectl top pod -n kube-system --sort-by='memory'
NAME                                           CPU(cores)   MEMORY(bytes)
ebs-csi-controller-5d4666c6f8-2j4sr            2m           54Mi
ebs-csi-controller-5d4666c6f8-d8vnb            4m           51Mi
aws-node-grjn6                                 4m           38Mi
aws-node-x2fpq                                 3m           38Mi
aws-node-4f8w9                                 4m           37Mi
...
kwatch
# configmap 생성
cat <<EOT > ~/kwatch-config.yaml
apiVersion: v1
kind: Namespace
metadata:
  name: kwatch
---
apiVersion: v1
kind: ConfigMap
metadata:
  name: kwatch
  namespace: kwatch
data:
  config.yaml: |
    alert:
      slack:
        webhook: '**https://hooks.slack.com/services/XXXXXXXX'
        title: $NICK-EKS
        #text:
    pvcMonitor:
      enabled: true
      interval: 5
      threshold: 70
EOT
$ kubectl apply -f kwatch-config.yaml

# 배포
$ kubectl apply -f https://raw.githubusercontent.com/abahmed/kwatch/v0.8.3/deploy/**deploy.yaml**
# 터미널1
$ watch kubectl get pod
# 잘못된 이미지 정보의 파드 배포
$ kubectl apply -f https://raw.githubusercontent.com/junghoon2/kube-books/main/ch05/nginx-error-pod.yml
$ kubectl get events -w
AST SEEN TYPE REASON OBJECT MESSAGE
40m Normal SuccessfullyReconciled targetgroupbinding/k8s-default-nginx-7955a49c3c Successfully reconciled
40m Warning BackendNotFound targetgroupbinding/k8s-default-nginx-7955a49c3c backend not found: Service "nginx" not found
1s Normal Scheduled pod/nginx-19 Successfully assigned default/nginx-19 to ip-192-168-2-23.ap-northeast-2.compute.internal
0s Normal Pulling pod/nginx-19 Pulling image "nginx:1.19.19"
42m Normal Scheduled pod/nginx-685c67bc9-snzh4 Successfully assigned default/nginx-685c67bc9-snzh4 to ip-192-168-3-177.ap-northeast-2.compute.internal
42m Normal Pulling pod/nginx-685c67bc9-snzh4 Pulling image "docker.io/bitnami/nginx:1.24.0-debian-11-r0"
41m Normal Pulled pod/nginx-685c67bc9-snzh4 Successfully pulled image "docker.io/bitnami/nginx:1.24.0-debian-11-r0" in 5.074856938s
41m Normal Created pod/nginx-685c67bc9-snzh4 Created container nginx
41m Normal Started pod/nginx-685c67bc9-snzh4 Started container nginx
40m Normal Killing pod/nginx-685c67bc9-snzh4 Stopping container nginx
42m Normal SuccessfulCreate replicaset/nginx-685c67bc9 Created pod: nginx-685c67bc9-snzh4
42m Normal ScalingReplicaSet deployment/nginx Scaled up replica set nginx-685c67bc9 to 1
41m Normal SuccessfullyReconciled ingress/nginx Successfully reconciled
0s Warning Failed pod/nginx-19 Failed to pull image "nginx:1.19.19": rpc error: code = NotFound desc = failed to pull and unpack image "docker.io/library/nginx:1.19.19": failed to resolve reference "docker.io/library/nginx:1.19.19": docker.io/library/nginx:1.19.19: not found
0s Warning Failed pod/nginx-19 Error: ErrImagePull
0s Normal BackOff pod/nginx-19 Back-off pulling image "nginx:1.19.19"
0s Warning Failed pod/nginx-19 Error: ImagePullBackOff
0s Normal Pulling pod/nginx-19 Pulling image "nginx:1.19.19"
0s Warning Failed pod/nginx-19 Failed to pull image "nginx:1.19.19": rpc error: code = NotFound desc = failed to pull and unpack image "docker.io/library/nginx:1.19.19": failed to resolve reference "docker.io/library/nginx:1.19.19": docker.io/library/nginx:1.19.19: not found
0s Warning Failed pod/nginx-19 Error: ErrImagePull
...
# 이미지 업데이트 방안2 : set 사용 - iamge 등 일부 리소스 값을 변경 가능!
$ kubectl set
$ kubectl set image pod nginx-19 nginx-pod=nginx:1.19
Every 2.0s: kubectl get pod Sun May 21 02:55:25 2023
NAME READY STATUS RESTARTS AGE
nginx-19 1/1 Running 0 52s
# 삭제
$ kubectl delete pod nginx-19Botkube
슬랙 앱 설정 : SLACK_API_BOT_TOKEN 과 SLACK_API_APP_TOKEN 생성
export SLACK_API_BOT_TOKEN='xoxb-XXXXX'
export SLACK_API_APP_TOKEN='xapp-XXXXX'
# repo 추가
$ helm repo add botkube https://charts.botkube.io
$ helm repo update
# 변수 지정
$ export ALLOW_KUBECTL=true
$ export ALLOW_HELM=true
$ export SLACK_CHANNEL_NAME=webhook3
#
cat <<EOT > botkube-values.yaml
actions:
'describe-created-resource': # kubectl describe
enabled: true
'show-logs-on-error': # kubectl logs
enabled: true
executors:
k8s-default-tools:
botkube/helm:
enabled: true
botkube/kubectl:
enabled: true
EOT
# 설치
$ helm install --version v1.0.0 botkube --namespace botkube --create-namespace \
--set communications.default-group.socketSlack.enabled=true \
--set communications.default-group.socketSlack.channels.default.name=${SLACK_CHANNEL_NAME} \
--set communications.default-group.socketSlack.appToken=${SLACK_API_APP_TOKEN} \
--set communications.default-group.socketSlack.botToken=${SLACK_API_BOT_TOKEN} \
--set settings.clusterName=${CLUSTER_NAME} \
--set 'executors.k8s-default-tools.botkube/kubectl.enabled'=${ALLOW_KUBECTL} \
--set 'executors.k8s-default-tools.botkube/helm.enabled'=${ALLOW_HELM} \
-f botkube-values.yaml botkube/botkube
# 참고 : 삭제 시
$ helm uninstall botkube --namespace botkube# 연결 상태, notifications 상태 확인
@Botkube ping
@Botkube status notifications
# 파드 정보 조회
@Botkube k get pod
@Botkube kc get pod --namespace kube-system
@Botkube kubectl get pod --namespace kube-system -o wide
# Actionable notifications
@Botkube kubectl# 터미널1
$ watch kubectl get pod
# 잘못된 이미지 정보의 파드 배포
$ kubectl apply -f https://raw.githubusercontent.com/junghoon2/kube-books/main/ch05/nginx-error-pod.yml
$ kubectl get events -w
@Botkube k get pod
# 이미지 업데이트 방안2 : set 사용 - iamge 등 일부 리소스 값을 변경 가능!
$ kubectl set
$ kubectl set image pod nginx-19 nginx-pod=nginx:1.19
@Botkube k get pod
# 삭제
kubectl delete pod nginx-19프로메테우스-스택
- 프로메테우스 오퍼레이터 : 프로메테우스 및 프로메테우스 오퍼레이터를 이용하여 메트릭 수집과 알람 기능을 실습합니다.
- Thanos 타노드 : 프로메테우스 확장성과 고가용성을 제공합니다.
제공 기능
- time series collection happens via a pull model over HTTP
- targets are discovered via service discovery or static configuration
프로메테우스-스택 설치 : 모니터링에 필요한 여러 요소를 단일 차트(스택)으로 제공 ← 시각화(그라파나), 이벤트 메시지 정책(경고 임계값, 경고 수준) 등 — Helm
# 모니터링
$ kubectl create ns monitoring
$ watch kubectl get pod,pvc,svc,ingress -n monitoring

# 사용 리전의 인증서 ARN 확인
$ CERT_ARN=`aws acm list-certificates --query 'CertificateSummaryList[].CertificateArn[]' --output text`
echo $CERT_ARN

# repo 추가
$ helm repo add prometheus-community https://prometheus-community.github.io/helm-charts

# 파라미터 파일 생성
$ cat <<EOT > monitor-values.yaml
prometheus:
  prometheusSpec:
    podMonitorSelectorNilUsesHelmValues: false
    serviceMonitorSelectorNilUsesHelmValues: false
    retention: 5d
    retentionSize: "10GiB"

  ingress:
    enabled: true
    ingressClassName: alb
    hosts:
      - prometheus.$MyDomain
    paths:
      - /*
    annotations:
      alb.ingress.kubernetes.io/scheme: internet-facing
      alb.ingress.kubernetes.io/target-type: ip
      alb.ingress.kubernetes.io/listen-ports: '[{"HTTPS":443}, {"HTTP":80}]'
      alb.ingress.kubernetes.io/certificate-arn: $CERT_ARN
      alb.ingress.kubernetes.io/success-codes: 200-399
      alb.ingress.kubernetes.io/load-balancer-name: myeks-ingress-alb
      alb.ingress.kubernetes.io/group.name: study
      alb.ingress.kubernetes.io/ssl-redirect: '443'

grafana:
  defaultDashboardsTimezone: Asia/Seoul
  adminPassword: prom-operator

  ingress:
    enabled: true
    ingressClassName: alb
    hosts:
      - grafana.$MyDomain
    paths:
      - /*
    annotations:
      alb.ingress.kubernetes.io/scheme: internet-facing
      alb.ingress.kubernetes.io/target-type: ip
      alb.ingress.kubernetes.io/listen-ports: '[{"HTTPS":443}, {"HTTP":80}]'
      alb.ingress.kubernetes.io/certificate-arn: $CERT_ARN
      alb.ingress.kubernetes.io/success-codes: 200-399
      alb.ingress.kubernetes.io/load-balancer-name: myeks-ingress-alb
      alb.ingress.kubernetes.io/group.name: study
      alb.ingress.kubernetes.io/ssl-redirect: '443'

defaultRules:
  create: false
kubeControllerManager:
  enabled: false
kubeEtcd:
  enabled: false
kubeScheduler:
  enabled: false
alertmanager:
  enabled: false

# alertmanager:
#   ingress:
#     enabled: true
#     ingressClassName: alb
#     hosts:
#       - alertmanager.$MyDomain
#     paths:
#       - /*
#     annotations:
#       alb.ingress.kubernetes.io/scheme: internet-facing
#       alb.ingress.kubernetes.io/target-type: ip
#       alb.ingress.kubernetes.io/listen-ports: '[{"HTTPS":443}, {"HTTP":80}]'
#       alb.ingress.kubernetes.io/certificate-arn: $CERT_ARN
#       alb.ingress.kubernetes.io/success-codes: 200-399
#       alb.ingress.kubernetes.io/load-balancer-name: myeks-ingress-alb
#       alb.ingress.kubernetes.io/group.name: study
#       alb.ingress.kubernetes.io/ssl-redirect: '443'
EOT
$ cat monitor-values.yaml | yh

# 배포
$ helm install kube-prometheus-stack prometheus-community/kube-prometheus-stack --version 45.27.2 \
--set prometheus.prometheusSpec.scrapeInterval='15s' --set prometheus.prometheusSpec.evaluationInterval='15s' \
-f monitor-values.yaml --namespace monitoring

# 확인
## alertmanager-0 : 사전에 정의한 정책 기반(예: 노드 다운, 파드 Pending 등)으로 시스템 경고 메시지를 생성 후 경보 채널(슬랙 등)로 전송
## grafana : 프로메테우스는 메트릭 정보를 저장하는 용도로 사용하며, 그라파나로 시각화 처리
## prometheus-0 : 모니터링 대상이 되는 파드는 ‘exporter’라는 별도의 사이드카 형식의 파드에서 모니터링 메트릭을 노출, pull 방식으로 가져와 내부의 시계열 데이터베이스에 저장
## node-exporter : 노드익스포터는 물리 노드에 대한 자원 사용량(네트워크, 스토리지 등 전체) 정보를 메트릭 형태로 변경하여 노출
## operator : 시스템 경고 메시지 정책(prometheus rule), 애플리케이션 모니터링 대상 추가 등의 작업을 편리하게 할수 있게 CRD 지원
## kube-state-metrics : 쿠버네티스의 클러스터의 상태(kube-state)를 메트릭으로 변환하는 파드
$ helm list -n monitoring
$ kubectl get pod,svc,ingress -n monitoring
NAME                                                            READY   STATUS    RESTARTS   AGE
pod/kube-prometheus-stack-grafana-778f55f4cd-zstjw              3/3     Running   0          2m1s
pod/kube-prometheus-stack-kube-state-metrics-5d6578867c-xtmpw   1/1     Running   0          2m1s
pod/kube-prometheus-stack-operator-74d474b47b-kfvg5             1/1     Running   0          2m1s
pod/kube-prometheus-stack-prometheus-node-exporter-4gqks        1/1     Running   0          2m1s
pod/kube-prometheus-stack-prometheus-node-exporter-kc9th        1/1     Running   0          2m1s
pod/kube-prometheus-stack-prometheus-node-exporter-tgknn        1/1     Running   0          2m1s
pod/prometheus-kube-prometheus-stack-prometheus-0               2/2     Running   0          116s

NAME                                                     TYPE        CLUSTER-IP       EXTERNAL-IP   PORT(S)    AGE
service/kube-prometheus-stack-grafana                    ClusterIP   10.100.143.76    <none>        80/TCP     2m1s
service/kube-prometheus-stack-kube-state-metrics         ClusterIP   10.100.198.41    <none>        8080/TCP   2m1s
service/kube-prometheus-stack-operator                   ClusterIP   10.100.34.146    <none>        443/TCP    2m1s
service/kube-prometheus-stack-prometheus                 ClusterIP   10.100.166.247   <none>        9090/TCP   2m1s
service/kube-prometheus-stack-prometheus-node-exporter   ClusterIP   10.100.188.88    <none>        9100/TCP   2m1s
service/prometheus-operated                              ClusterIP   None             <none>        9090/TCP   116s

NAME                                                         CLASS   HOSTS                            ADDRESS                                                         PORTS   AGE
ingress.networking.k8s.io/kube-prometheus-stack-grafana      alb     grafana.wellbeconnected.com      myeks-ingress-alb-1399011434.ap-northeast-2.elb.amazonaws.com   80      2m1s
ingress.networking.k8s.io/kube-prometheus-stack-prometheus   alb     prometheus.wellbeconnected.com   myeks-ingress-alb-1399011434.ap-northeast-2.elb.amazonaws.com   80      2m1s

$ kubectl get-all -n monitoring

$ kubectl get prometheus,servicemonitors -n monitoring
NAME                                                                VERSION   DESIRED   READY   RECONCILED   AVAILABLE   AGE
prometheus.monitoring.coreos.com/kube-prometheus-stack-prometheus   v2.42.0   1         1       True         True        68s

NAME                                                                                  AGE
servicemonitor.monitoring.coreos.com/kube-prometheus-stack-apiserver                  68s
servicemonitor.monitoring.coreos.com/kube-prometheus-stack-coredns                    68s
servicemonitor.monitoring.coreos.com/kube-prometheus-stack-grafana                    68s
servicemonitor.monitoring.coreos.com/kube-prometheus-stack-kube-proxy                 68s
servicemonitor.monitoring.coreos.com/kube-prometheus-stack-kube-state-metrics         68s
servicemonitor.monitoring.coreos.com/kube-prometheus-stack-kubelet                    68s
servicemonitor.monitoring.coreos.com/kube-prometheus-stack-operator                   68s
servicemonitor.monitoring.coreos.com/kube-prometheus-stack-prometheus                 68s
servicemonitor.monitoring.coreos.com/kube-prometheus-stack-prometheus-node-exporter   68s

$ kubectl get crd | grep monitoring
alertmanagerconfigs.monitoring.coreos.com    2023-05-20T18:03:51Z
alertmanagers.monitoring.coreos.com          2023-05-20T18:03:51Z
podmonitors.monitoring.coreos.com            2023-05-20T18:03:51Z
probes.monitoring.coreos.com                 2023-05-20T18:03:51Z
prometheuses.monitoring.coreos.com           2023-05-20T18:03:52Z
prometheusrules.monitoring.coreos.com        2023-05-20T18:03:52Z
servicemonitors.monitoring.coreos.com        2023-05-20T18:03:52Z
thanosrulers.monitoring.coreos.com           2023-05-20T18:03:52Z

# helm 삭제
helm uninstall -n monitoring kube-prometheus-stack

# crd 삭제
kubectl delete crd alertmanagerconfigs.monitoring.coreos.com
kubectl delete crd alertmanagers.monitoring.coreos.com
kubectl delete crd podmonitors.monitoring.coreos.com
kubectl delete crd probes.monitoring.coreos.com
kubectl delete crd prometheuses.monitoring.coreos.com
kubectl delete crd prometheusrules.monitoring.coreos.com
kubectl delete crd servicemonitors.monitoring.coreos.com
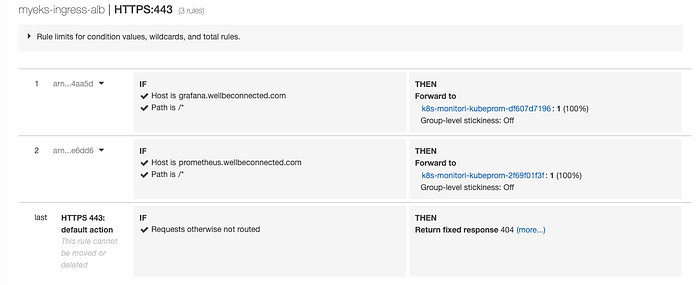
kubectl delete crd thanosrulers.monitoring.coreos.com- AWS ELB(ALB) 갯수 확인 → Rule 확인
- (참고) kube-controller-manager, kube-scheduler 수집 불가
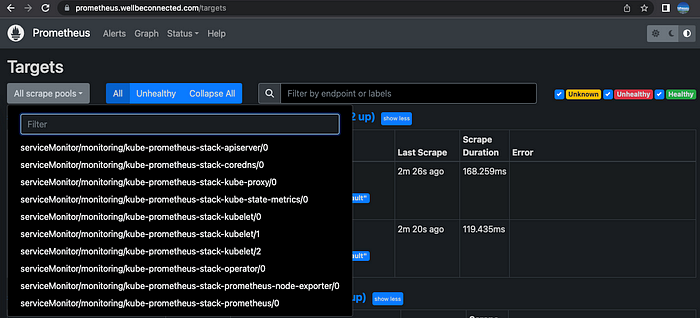
- 프로메테우스 웹 → Status → Targets 확인 : kube-controller-manager, kube-scheduler 없음 확인
프로메테우스 기본 사용 : 모니터링 그래프
- 모니터링 대상이 되는 서비스는 일반적으로 자체 웹 서버의 /metrics 엔드포인트 경로에 다양한 메트릭 정보를 노출
- 이후 프로메테우스는 해당 경로에 http get 방식으로 메트릭 정보를 가져와 TSDB 형식으로 저장
# 아래 처럼 프로메테우스가 각 서비스의 9100 접속하여 메트릭 정보를 수집
$ kubectl get node -owide
$ kubectl get svc,ep -n monitoring kube-prometheus-stack-prometheus-node-exporter
NAME                                                     TYPE        CLUSTER-IP      EXTERNAL-IP   PORT(S)    AGE
service/kube-prometheus-stack-prometheus-node-exporter   ClusterIP   10.100.188.88   <none>        9100/TCP   23m

NAME                                                       ENDPOINTS                                                 AGE
endpoints/kube-prometheus-stack-prometheus-node-exporter   192.168.1.177:9100,192.168.2.23:9100,192.168.3.177:9100   23m

# 노드의 9100번의 /metrics 접속 시 다양한 메트릭 정보를 확인할수 있음 : 마스터 이외에 워커노드도 확인 가능
$ ssh ec2-user@$N1 curl -s localhost:9100/metrics

$ kubectl get ingress -n monitoring kube-prometheus-stack-prometheus
NAME                               CLASS   HOSTS                            ADDRESS                                                         PORTS   AGE
kube-prometheus-stack-prometheus   alb     prometheus.wellbeconnected.com   myeks-ingress-alb-1399011434.ap-northeast-2.elb.amazonaws.com   80      23m

$ kubectl describe ingress -n monitoring kube-prometheus-stack-prometheus
Name:             kube-prometheus-stack-prometheus
Labels:           app=kube-prometheus-stack-prometheus
                  app.kubernetes.io/instance=kube-prometheus-stack
                  app.kubernetes.io/managed-by=Helm
                  app.kubernetes.io/part-of=kube-prometheus-stack
                  app.kubernetes.io/version=45.27.2
                  chart=kube-prometheus-stack-45.27.2
                  heritage=Helm
                  release=kube-prometheus-stack
Namespace:        monitoring
Address:          myeks-ingress-alb-1399011434.ap-northeast-2.elb.amazonaws.com
Ingress Class:    alb
Default backend:  <default>
Rules:
  Host                            Path  Backends
  ----                            ----  --------
  prometheus.wellbeconnected.com
                                  /*   kube-prometheus-stack-prometheus:9090 (192.168.2.191:9090)
Annotations:                      alb.ingress.kubernetes.io/certificate-arn: arn:aws:acm:ap-northeast-2:903575331688:certificate/3f025fab-6859-4cad-9d60-0c5887053d70
                                  alb.ingress.kubernetes.io/group.name: study
                                  alb.ingress.kubernetes.io/listen-ports: [{"HTTPS":443}, {"HTTP":80}]
                                  alb.ingress.kubernetes.io/load-balancer-name: myeks-ingress-alb
                                  alb.ingress.kubernetes.io/scheme: internet-facing
                                  alb.ingress.kubernetes.io/ssl-redirect: 443
                                  alb.ingress.kubernetes.io/success-codes: 200-399
                                  alb.ingress.kubernetes.io/target-type: ip
                                  meta.helm.sh/release-name: kube-prometheus-stack
                                  meta.helm.sh/release-namespace: monitoring
Events:
  Type    Reason                  Age                From     Message
  ----    ------                  ----               ----     -------
  Normal  SuccessfullyReconciled  23m (x2 over 23m)  ingress  Successfully reconciled

# 프로메테우스 ingress 도메인으로 웹 접속
$ echo -e "Prometheus Web URL = https://prometheus.$MyDomain"
Prometheus Web URL = https://prometheus.wellbeconnected.com

# 웹 상단 주요 메뉴 설명
1. 경고(Alert) : 사전에 정의한 시스템 경고 정책(Prometheus Rules)에 대한 상황
2. 그래프(Graph) : 프로메테우스 자체 검색 언어 PromQL을 이용하여 메트릭 정보를 조회 -> 단순한 그래프 형태 조회
3. 상태(Status) : 경고 메시지 정책(Rules), 모니터링 대상(Targets) 등 다양한 프로메테우스 설정 내역을 확인 > 버전(2.42.0)
4. 도움말(Help)

그라파나 Grafana
TSDB 데이터를 시각화, 다양한 데이터 형식 지원합니다.(메트릭, 로그, 트레이스 등)
그라파나는 시각화 솔루션으로 데이터 자체를 저장하지 않음 → 현재 실습 환경에서는 데이터 소스는 프로메테우스를 사용합니다.
접속 정보 확인 및 로그인 : 기본 계정 — admin / prom-operator
# 그라파나 버전 확인
$ kubectl exec -it -n monitoring deploy/kube-prometheus-stack-grafana -- grafana-cli --version
grafana cli version 9.5.1

# ingress 확인
$ kubectl get ingress -n monitoring kube-prometheus-stack-grafana
NAME                            CLASS   HOSTS                         ADDRESS                                                         PORTS   AGE
kube-prometheus-stack-grafana   alb     grafana.wellbeconnected.com   myeks-ingress-alb-1399011434.ap-northeast-2.elb.amazonaws.com   80      26m

$ kubectl describe ingress -n monitoring kube-prometheus-stack-grafana
Name:             kube-prometheus-stack-grafana
Labels:           app.kubernetes.io/instance=kube-prometheus-stack
                  app.kubernetes.io/managed-by=Helm
                  app.kubernetes.io/name=grafana
                  app.kubernetes.io/version=9.5.1
                  helm.sh/chart=grafana-6.56.2
Namespace:        monitoring
Address:          myeks-ingress-alb-1399011434.ap-northeast-2.elb.amazonaws.com
Ingress Class:    alb
Default backend:  <default>
Rules:
  Host                         Path  Backends
  ----                         ----  --------
  grafana.wellbeconnected.com
                               /   kube-prometheus-stack-grafana:80 (192.168.3.76:3000)
Annotations:                   alb.ingress.kubernetes.io/certificate-arn: arn:aws:acm:ap-northeast-2:903575331688:certificate/3f025fab-6859-4cad-9d60-0c5887053d70
                               alb.ingress.kubernetes.io/group.name: study
                               alb.ingress.kubernetes.io/listen-ports: [{"HTTPS":443}, {"HTTP":80}]
                               alb.ingress.kubernetes.io/load-balancer-name: myeks-ingress-alb
                               alb.ingress.kubernetes.io/scheme: internet-facing
                               alb.ingress.kubernetes.io/ssl-redirect: 443
                               alb.ingress.kubernetes.io/success-codes: 200-399
                               alb.ingress.kubernetes.io/target-type: ip
                               meta.helm.sh/release-name: kube-prometheus-stack
                               meta.helm.sh/release-namespace: monitoring
Events:
  Type    Reason                  Age   From     Message
  ----    ------                  ----  ----     -------
  Normal  SuccessfullyReconciled  26m   ingress  Successfully reconciled

# ingress 도메인으로 웹 접속 : 기본 계정 - admin / prom-operator
$ echo -e "Grafana Web URL = https://grafana.$MyDomain"
Grafana Web URL = https://grafana.wellbeconnected.com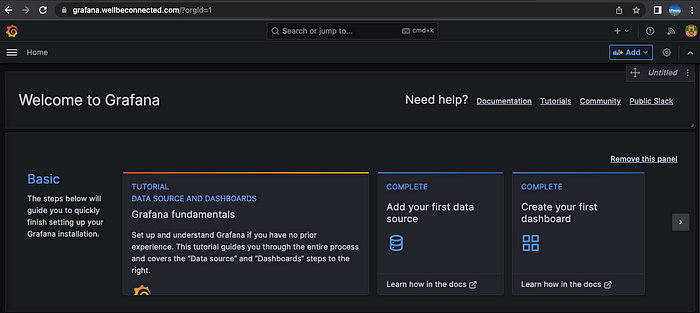
그라파나 메뉴
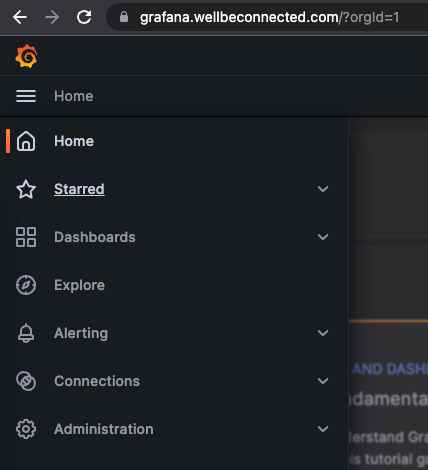
Connections → Your connections : 스택의 경우 자동으로 프로메테우스를 데이터 소스로 추가해둠 ← 서비스 주소 확인

# 서비스 주소 확인
$ kubectl get svc,ep -n monitoring kube-prometheus-stack-prometheus
NAME                                       TYPE        CLUSTER-IP       EXTERNAL-IP   PORT(S)    AGE
service/kube-prometheus-stack-prometheus   ClusterIP   10.100.166.247   <none>        9090/TCP   30m

NAME                                         ENDPOINTS            AGE
endpoints/kube-prometheus-stack-prometheus 192.168.2.191:9090 30m- 해당 데이터 소스 접속 확인
# 테스트용 파드 배포
$ cat <<EOF | kubectl create -f -
apiVersion: v1
kind: Pod
metadata:
  name: netshoot-pod
spec:
  containers:
  - name: netshoot-pod
    image: nicolaka/netshoot
    command: ["tail"]
    args: ["-f", "/dev/null"]
  terminationGracePeriodSeconds: 0
EOF
$ kubectl get pod netshoot-pod
NAME           READY   STATUS              RESTARTS   AGE
netshoot-pod   0/1     ContainerCreating   0          5s

# 접속 확인
$ kubectl exec -it netshoot-pod -- nslookup kube-prometheus-stack-prometheus.monitoring
Server:  10.100.0.10
Address: 10.100.0.10#53

Name: kube-prometheus-stack-prometheus.monitoring.svc.cluster.local
Address: 10.100.166.247

$ kubectl exec -it netshoot-pod -- curl -s kube-prometheus-stack-prometheus.monitoring:9090/graph -v ; echo
*   Trying 10.100.166.247:9090...
* Connected to kube-prometheus-stack-prometheus.monitoring (10.100.166.247) port 9090 (#0)
> GET /graph HTTP/1.1
> Host: kube-prometheus-stack-prometheus.monitoring:9090
> User-Agent: curl/8.0.1
> Accept: */*
>
< HTTP/1.1 200 OK
< Date: Sat, 20 May 2023 18:36:43 GMT
< Content-Length: 734
< Content-Type: text/html; charset=utf-8
<
* Connection #0 to host kube-prometheus-stack-prometheus.monitoring left intact
<!doctype html><html lang="en"><head><meta charset="utf-8"/><link rel="shortcut icon" href="./favicon.ico"/><meta name="viewport" content="width=device-width,initial-scale=1,shrink-to-fit=no"/><meta name="theme-color" content="#000000"/><script>const GLOBAL_CONSOLES_LINK="",GLOBAL_AGENT_MODE="false",GLOBAL_READY="true"</script><link rel="manifest" href="./manifest.json" crossorigin="use-credentials"/><title>Prometheus Time Series Collection and Processing Server</title><script defer="defer" src="./static/js/main.c1286cb7.js"></script><link href="./static/css/main.cb2558a0.css" rel="stylesheet"></head><body class="bootstrap"><noscript>You need to enable JavaScript to run this app.</noscript><div id="root"></div></body></html>

# 삭제
$ kubectl delete pod netshoot-pod
기본 대시보드
- 스택을 통해서 설치된 기본 대시보드 확인 : Dashboards → Browse
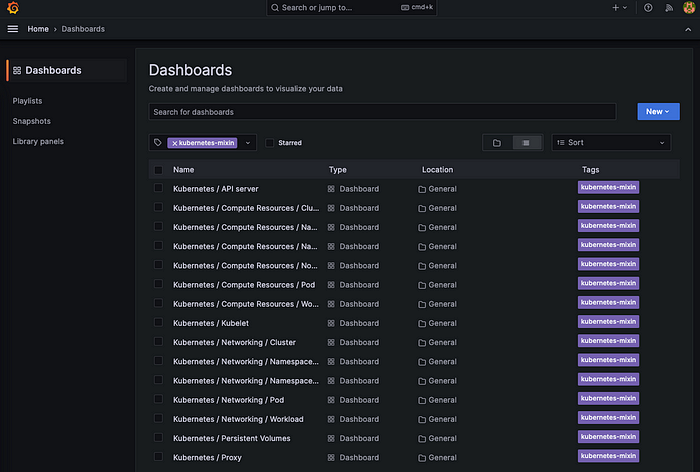
공식 대시보드 가져오기
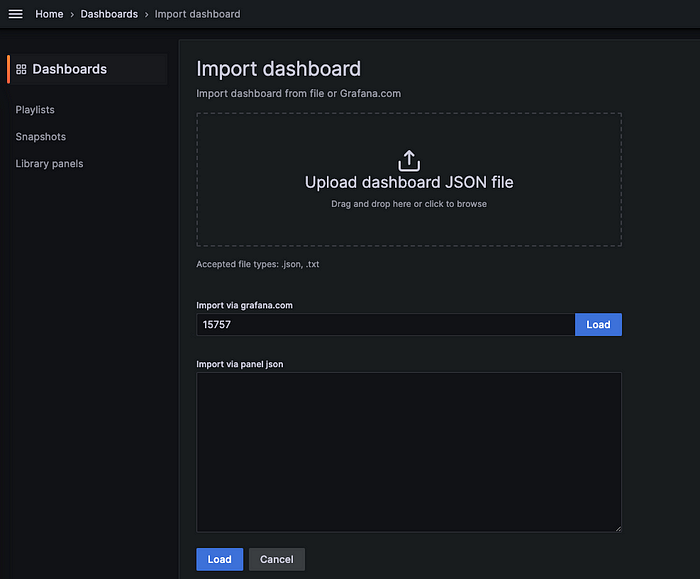
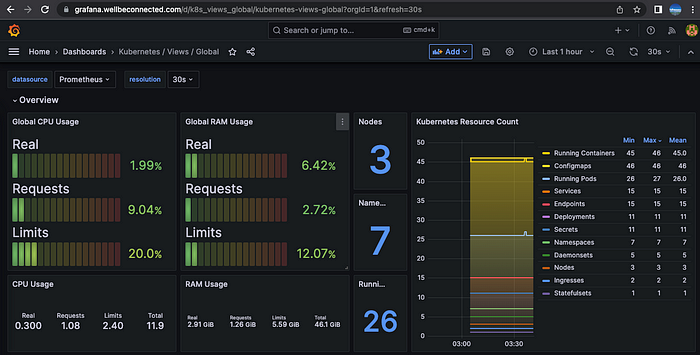
- Dashboard → New → Import : 원하는 대시보드 입력(예: 15757, 13770, 1860, 15172, 13332, 16032 등)
[도전과제]
CW Logs Insights 사용법 — 링크
Improve Cluster Monitoring With Network Mapping in Grafana — 링크
프로메테우스 메트릭을 CW 메트릭으로 변환 후 수집 : Prometheus metrics collection on Amazon EKS and Kubernetes clusters — 링크
Set up and configure Prometheus metrics collection on Amazon EKS and Kubernetes clusters - Amazon CloudWatch
Thanks for letting us know this page needs work. We're sorry we let you down. If you've got a moment, please tell us how we can make the documentation better.
docs.aws.amazon.com
blog migration project
written in 2023.5.21
https://medium.com/techblog-hayleyshim/aws-eks-observability-21bc33fa27dc
'IT > Infra&Cloud' 카테고리의 다른 글
| [aws] EKS Security (0) | 2023.10.30 |
|---|---|
| [aws] EKS Autoscaling (0) | 2023.10.30 |
| [aws] EKS Storage & Node (0) | 2023.10.29 |
| [aws] EKS Networking (0) | 2023.10.29 |
| [aws] EKS 설치 및 기본 사용 (0) | 2023.10.29 |
- Total
- Today
- Yesterday
- 혼공챌린지
- cloud
- autoscaling
- AWS
- 혼공단
- SDWAN
- k8s
- S3
- VPN
- 혼공파
- cni
- NW
- CICD
- 파이썬
- terraform
- EKS
- NFT
- security
- k8s cni
- AI
- handson
- IaC
- GCP
- GKE
- k8s calico
- 도서
- PYTHON
- AI Engineering
- ai 엔지니어링
- operator
| 일 | 월 | 화 | 수 | 목 | 금 | 토 |
|---|---|---|---|---|---|---|
| 1 | 2 | 3 | 4 | 5 | 6 | 7 |
| 8 | 9 | 10 | 11 | 12 | 13 | 14 |
| 15 | 16 | 17 | 18 | 19 | 20 | 21 |
| 22 | 23 | 24 | 25 | 26 | 27 | 28 |
